Star trails are magical. They present the obvious actions of the celebs over an extended time frame, a results of the rotation of the Earth. And even higher, they’re simple to {photograph} and course of in Adobe Photoshop!
The primary half, photographing within the subject, is straightforward. Take many photographs of the evening sky in succession, one proper after one other. After all, you may need to use a tripod to maintain every thing regular.
That was easy, wasn’t it?
Now, you should use Photoshop to “stack” them to make them into lengthy star trails. Photoshop has some good benefits for “stacking.” I am going to level a few of these out close to the top.
Step One: Stack Your Pictures!

Fireplace up Photoshop. This’ll be enjoyable. Merely go to “File.” Choose “Scripts.” Then choose “Load Information into Stack.”
Step Two: Choose The Information You are Gonna Stack for Star Trails!
After deciding on “Load Information into Stack,” Photoshop will produce a dialog field so you may choose the recordsdata you need to stack into your superb star trails.
Click on the “Browse” button. Then merely navigate to the place your recordsdata are, choose them, and hit “OK.” You needn’t test any of the bins under, assuming that your digital camera and tripod didn’t transfer. Moreover, that’ll make the method take longer!
Step Three: Let These Stars Shine By means of!
Photoshop will stack your whole photographs. That is proper, a stack.
Here is an instance. In case you had printed your whole particular person photographs on paper, it could be as in the event that they had been all stacked on high of one another in a single neat pile.
Photoshop is simply doing this digitally. Lean again and loosen up. In case you have many photographs and a gradual pc, go get a drink.

As soon as Photoshop is completed, you may say, “Okay… I see all of the layers of photographs on the underside proper facet… however I do not see any star trails!” And like our examples of stacking printed photographs, you would not see them there both.
However you and Photoshop have magic powers. You may flip your stacked “digital papers” (our layers, in different phrases) into “magic paper.” Cool, huh?
First, spotlight all of the layers besides the very backside layer.

Then go to the Layers tab simply above the place all of your photographs are stacked. See the place the large purple arrow is pointing? Change that from “Regular” to “Lighten.” Then lean again and smile. Yeah. Prompt star trails! That is one in every of my favourite components. I really like seeing that immediate transformation when all the celebs shine by way of to disclose these stunning, lengthy trails.
Bonus Tip: You Can Get Rid of Airplane Trails or Undesirable Lights!
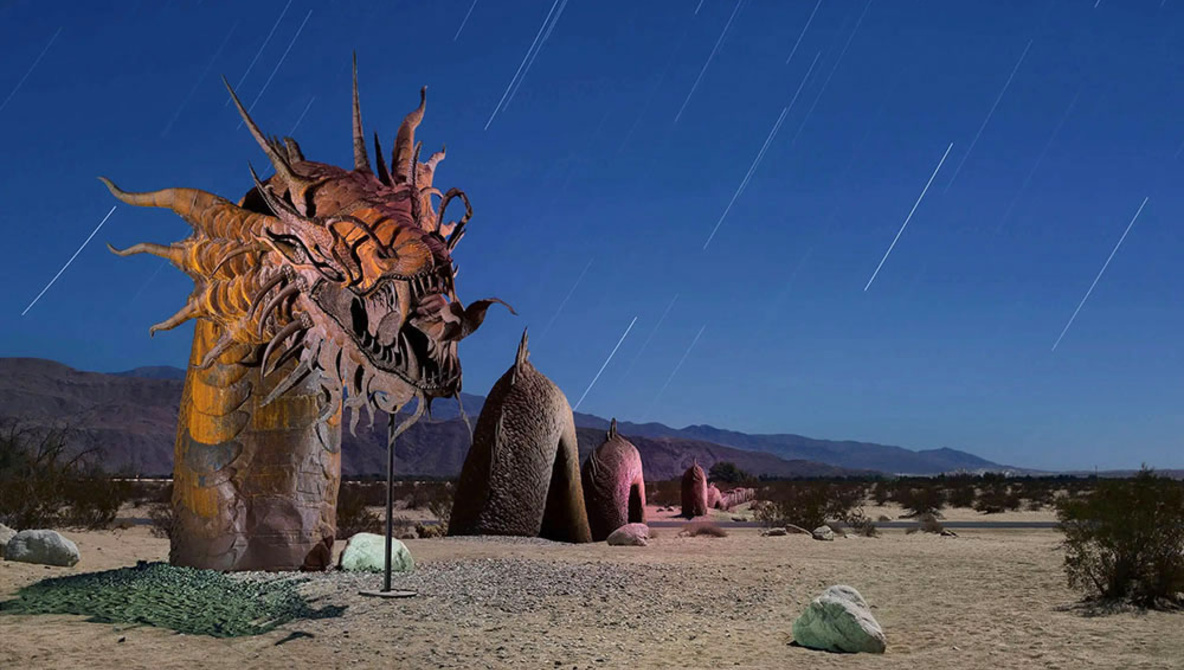
In case you take a look at this picture above, you may see some airplane trails and a few lights from me mistakenly shining the sunshine into the digital camera whereas illuminating the large dragon sculpture. Subsequent, we’ll focus on how you can do away with that.
Some individuals don’t need airplanes of their star trails. Or possibly you mistakenly shine a lightweight within the digital camera, and you don’t need that. This bonus part is for you.
Some select not to do that. And that is okay too. It is your picture. You are in cost!

The purple arrow is pointing to one of many many white layer masks. I’ve created loads of layer masks, one for every layer. I needed to do away with the numerous airplane trails. There have been ten airplanes that flew by way of whereas I used to be taking photographs for this picture. This location is immediately within the flight path to San Diego, so there are loads of airplanes.
Creating Layer Masks So We Can Masks Out All That Stuff We Do not Need
Choose one layer that has the airplane trails or undesirable gentle that you don’t need. Go to the highest menu. “Select Layer” > “Layer Masks” > “Reveal All.” Or hit the layer masks icon on the backside proper nook. Both means works. This could produce a white rectangle to the fitting of your chosen layer. That is your layer masks!
Then choose the Brush device. It is situated on the left facet of the picture. Select the black colour. Make it possible for the white layer masks is chosen as an alternative of the particular layer itself. Then merely begin portray away on the world that you really want hid. You must see the undesirable merchandise start to vanish. The black colour stops that one a part of the picture from shining by way of! It is like magic! White reveals, black conceals.

You may see the ultimate picture with out the airplane trails. This picture is 28 minutes of complete publicity. Every particular person picture was a two-minute publicity at f/6.3 and ISO 200. The star trails are comparatively straight as a result of I’m zooming in from farther away, and we’re not dealing with immediately north or south, so that they are usually straighter and longer when they’re farther from the North or South Celestial Poles.
It is actually that simple. In case you do not prefer it, hit “Undo” (or paint over what you probably did after deciding on a white colour).
What Else Can We Get Rid of Utilizing Layer Masks?
Layer masks can be utilized to do away with “sizzling spots” out of your gentle portray as properly. Or shadows. Actually, something that solely exists on one layer, you may remove non-destructively. In case you do not prefer it later, return and alter it.
About This Huge Dragon Serpent Sculpture
The big rattledragon sculpture is situated in Borrego Springs, California. The sculpture was created by grasp sculptor Ricardo Breceda. Your entire dragon serpent is 350 toes lengthy, seemingly undulating below the desert sand. I used a handheld gentle to light up the sculpture. This took me some time since I needed to stroll an extended distance, even crossing a street, to light up all of it!